


How to Design Business Process Model and Notation (BPMN) For a Mobile App

It takes a while for an app to reach the market. Enhancing an app’s appearance, functionality, and marketability entails numerous detours and obstacles. One method to get around these problems is to create a prototype for a mobile app, which serves as a testing ground for conceptual presumptions.
Good prototype design uses prototyping tools to participate in the process. It draws on Design Thinking and UX principles to address structural issues and make improvements before developing the MVP app. A good mobile app prototype can also assist in reducing the risks associated with low investment, subpar design, misaligned user needs, and unavoidable market failure. Let’s learn how to create one.
A prototype is a functioning version of the upcoming mobile application. Making it clear what the app’s functionality, appearance, and other features will be like, a prototype helps us generate app design and assists in expressing a product’s overall feel and look while also providing a preview of how it can operate.
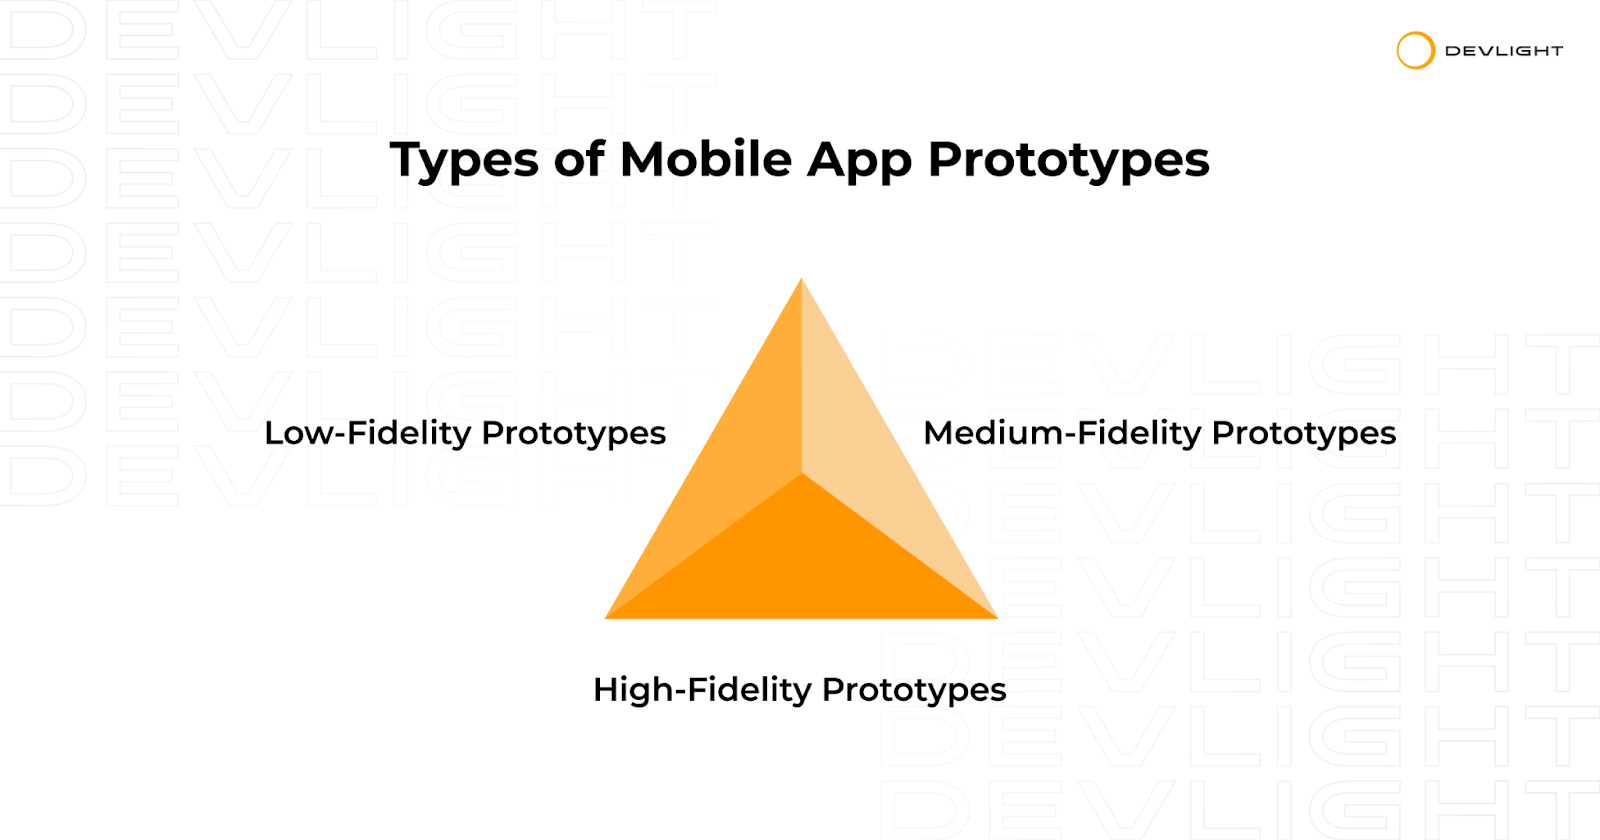
Depending on the needs of stakeholders and the goals of the prototyping, UI/UX designers employ a variety of prototyping techniques. App prototype often progresses from the basic to the most complex stages, perfecting the final appearance of the product:
Goal – Visually represent an app idea
The simplest mobile app prototypes are those made using means accessible for everyone. How to create a prototype for a mobile app with low fidelity? Usually, these are hand-drawn sketches presented on paper or in a digital setting. Each doodle will represent a different screen of the mobile application. By looking through such sketches, you may get a sense of how the app is intended to operate.
Goal – Confirm the app’s concept and basic structure
You could think of these prototypes as the stage between low-fidelity and high-fidelity. They are made using specialized prototyping tools, such as those listed in the following sections. However, a whiteboard or piece of paper can also be appropriate. Prototypes with a medium level of realism frequently include storyboards, use cases, interactive design solutions, and more.
Goal – Negotiate the final design
Using high-fidelity prototypes is the easiest approach to obtaining practical design experience without touching code. These are created only with specialized software because this is the time when buttons and features should be implemented. A high-fidelity prototype is a test version of the final software you plan to develop.
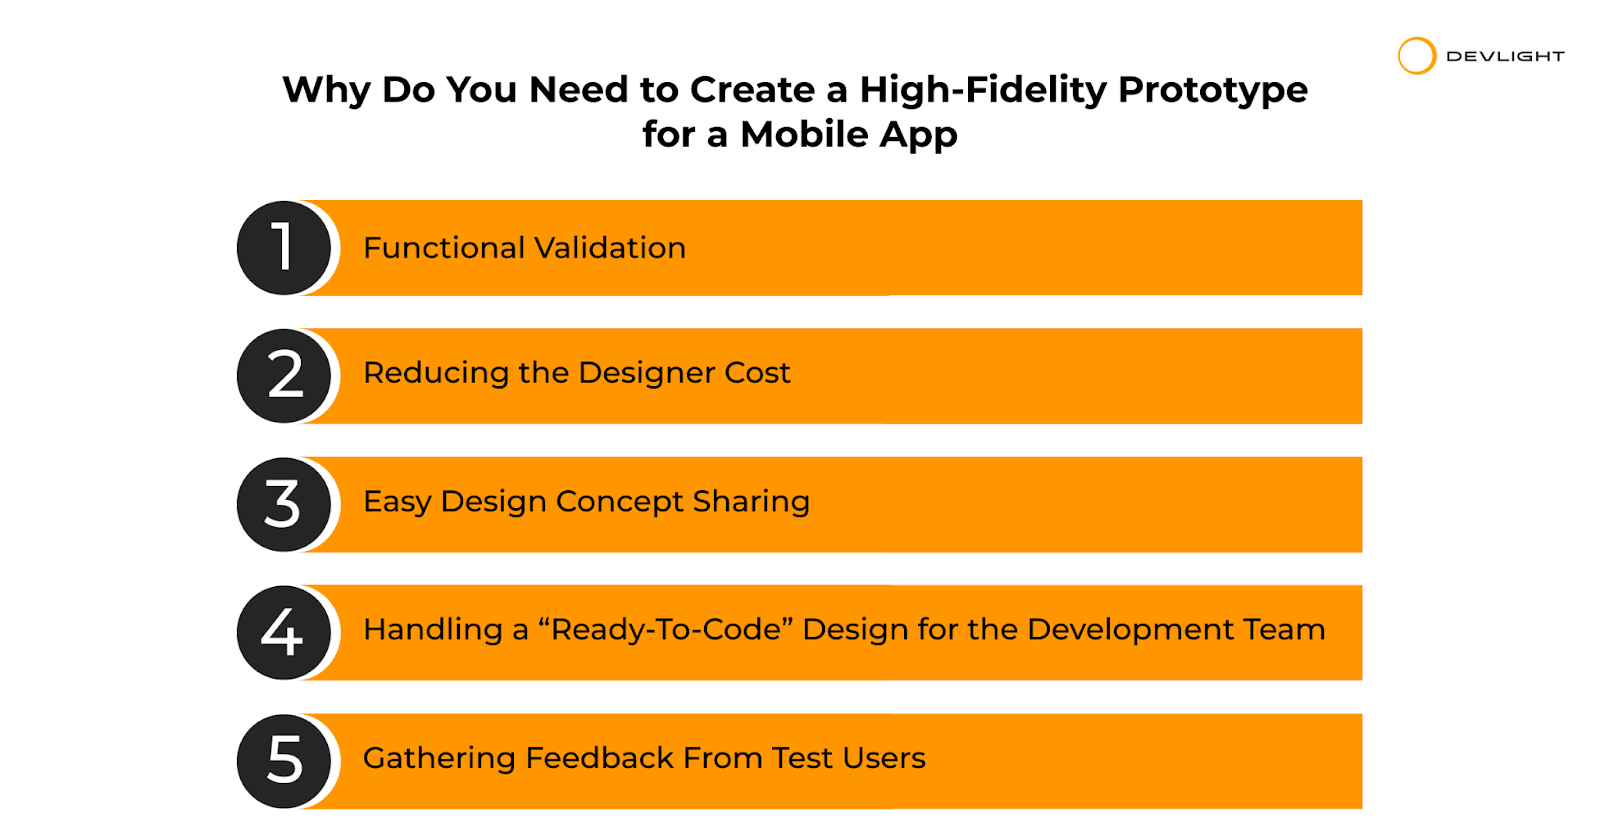
Consider application prototypes as your idea’s first draft. It is designed to gather early feedback prior to moving on to the next development stage, as it only displays the app’s most fundamental functions. Here are a few reasons why creating a mobile app prototype before hopping into developing a finished product is a good idea:
With a high-fidelity prototype, you can simulate the core functionalities of your mobile app, including navigation, interactive elements, data input, and output. By testing these functionalities, you can identify technical feasibility, usability challenges, and potential performance issues early in the design process. This allows you to make informed decisions and necessary adjustments before moving to development.
How to create a prototype for a mobile app to save time and effort spent on design? Validating assumptions and exploring new solutions are key, especially when you’re working with multiple designers or design solutions. Although not everyone incorporates prototyping into their design process, it can be incredibly helpful in a variety of circumstances.
Even if the prototype requires multiple iterations, the final product’s cost will be substantially lower than that of just one unanticipated change round in development. This gives you space to make mistakes, implement additional change rounds, or totally reset the project while still delivering it on schedule and within budget.
Not only is prototyping a fantastic testing tool, but it’s also a useful project roadmap. It provides a tool for visually expressing your app’s design, flow, and functionality. Less ambiguity exists in features and components, which considerably eliminates bugs and misunderstandings. People are also involved with a prototype. Everyone on the development team is welcome to offer suggestions, including vendors and clients. Diverse points of view help your app become considerably more well-rounded.
By showcasing a mobile app prototype to the development team, you can effectively communicate your vision and specific requirements, allowing them to grasp the desired functionality and user experience better. This hands-on demonstration will enable the team to assess the complexity of the project, identify potential challenges, and provide a more precise estimation of the time and resources required for development. Additionally, the prototype serves as a valuable tool for gathering valuable feedback from the team, fostering collaboration, and aligning everyone toward a common goal.
It’s beneficial to prototype your ideas and share them with your target market because it’s crucial to gain early user feedback while building new app products. A prototype can speed up the design process and help you work through new or amended concepts.
How to create a prototype for a mobile app that will speak to the target audience? You should first determine your app’s target market and audience, study their demographics, and create user personas. We have discussed these steps and more in our previous articles.
It’s all in App Playbook. Our tried-and-true sequence of 75 tasks has already driven 35M installs, and now it’s your turn to experience the same level of success!

Making a prototype is very similar to making the actual app. It begins with a clear objective and the elements you want to incorporate:
Making sure you have a problem worth tackling is one of the first steps in developing a high-quality app. This step may sound very simple. It is. However, you’d be astonished at how many individuals approach the idea of developing something simply because it looks “cool.”
Building an app just because it’s cool is not a successful path. Create an app because you want to be able to contact your friends more quickly. Create an app because you believe that the dating industry is flawed. Create an app because you want to address an issue you see around you that also speaks to other people. Then, study the market to find your direct competitors or ensure the niche is free.
Your prototype for a mobile app should concentrate on the features that are crucial, ground-breaking, and extremely important to your users. You’ll devote the most time to the prototype’s simulation or development of these elements. Remember that a prototype’s goal is to create a testable mockup of your app quickly and ergonomically. Thus, identifying must-have features is vital. It will take longer to implement features if you have a large number of them. You also risk spending time on features that won’t be included in the final product at all.
It’s now time to draw out your app idea on paper or in a digital environment. The primary screens of your app should be included in the sketch, also known as a low-fidelity wireframe, with the first layout showcasing the user interface components you want to implement. Then, add arrows to show how users will move across screens.
For instance, if you’re developing an e-commerce app, doodle out a basic layout for the product screen. The product picture and buttons, including the “Checkout” button, can be represented with drawn placeholders. Then create an arrow to the checkout screen from that button to demonstrate what occurs when a user taps it.
A prototype for a mobile app helps you test the designs without writing any code, present your ideas to other project participants, demonstrate various components of your app, get feedback on each screen or its overall flow, and simulate how users will interact with what you’re designing.
Figma and InVision Studio are the two main mobile app wireframing tools that most designers utilize so as to make things straightforward. They both provide a variety of features and are simple to use, including the ability to build interactive wireframes, mockups, and high-fidelity prototypes:
Wireframes act as a transitional stage between your first prototype and pen-and-paper sketches. By eliminating unnecessary aspects like colors or copy, they assist you in planning the layout and user interaction patterns. The suggested user path should be obvious without the use of color, shading, or elaborate menus.
You’ll use a variety of tools in this stage to convert the paper wireframe you created into something digital and functional. How to create a prototype for a mobile app? Set the app screens first using your wireframe sketch as a guide. The user interface can be improved further by including UI components like buttons and text inputs. You can also experiment with colors as an option.
Fortunately, the majority of prototype tools contain a comprehensive library of standard iOS and Android UI elements for you to create an app prototype that looks professional straightaway. When you’re satisfied with your app’s appearance, you can add animations and pre-planned interactions to bring it to life.
It’s time to start using the prototype now that it’s ready. To ensure you receive the most varied input, encourage as many individuals as you can to try it out. Your coworkers will be the quickest and most straightforward users to take part in the testing process.
Include everyone — don’t limit it to the development team members. Inform the HR, accounting, and marketing personnel about your prototype for a mobile app. Additionally, you can find testers among your friends and relatives. However, your app’s end users are by far the most important group to test it with. Your aim at this point is to gather as much feedback as you can from whoever tests your prototype.
Once you have finalized the wireframes and received feedback on the app’s structure and functionality, it’s time to transform the wireframes into polished, high-fidelity designs. Start by translating the wireframes into visual designs that reflect the branding and aesthetics of your app. Consider the color scheme, typography, icons, and overall visual style. Ensure that the designs align with your app’s objectives and target audience.
Once your final designs are complete, document design specifications that outline details such as colors, typography, spacing, and interactions. These specifications will serve as a reference for developers during the implementation phase.
By translating wireframes into final designs, you can bring your app’s user interface to life, ensuring that it aligns with your vision and provides an intuitive and visually appealing experience for your users.
App Playbook is the ultimate solution. With a bulletproof sequence of 75 App Building Tasks and real-life cases that have already driven 35M app installs, your app’s success is guaranteed!
Tools we use to create a prototype for a mobile app accelerate and facilitate the design process overall. Inexpensive or even free, they serve as powerful means for creating wireframes and mockups. After you decide you want to use something more than paper or a whiteboard, consider the next mobile app prototyping tools:
MockPlus
This all-in-one prototype tool enables non-professionals and designers to work with interactive prototyping to transform a concept into a mockup of a product swiftly. Simplify your design and test ideas on any platform without coding. Mpckplus makes your design life considerably longer and the development process more comfortable. Work together in real time with your colleagues, go over designs together, hold online brainstorming sessions, and build a seamless design-development handoff.
Balsamiq
Balsamiq claims to provide a useful wireframing platform that will banish ugly user interfaces from the globe. If you want to carry out a modern wireframing stage for your mobile app, web app, or website, use Balsamiq. Additionally, quickly follow your ideas to iterate designs without disrupting, thanks to the pre-installation of various components with a handwriting style.
Moqups
This tool helps you illustrate your concept in one location and generate diagrams, wireframes, mockups, and prototypes inside a simple-to-maintain interface. Keeping all the stakeholders in one location may progress the project from using the prototype for a mobile app with low fidelity to high fidelity and receive final certification in a few simple steps.
InVision Studio
InVision is a digital design-to-development platform used to create excellent mobile prototypes and high-quality apps. The durable and simple nature of the digital whiteboard makes InVision Studio ideal for teamwork and idea validation.
The InVision toolkit also includes InVision DSM, a design system manager, a library where you can store and manage all of your brand and UX components, and InVision Cloud, where you can connect, save, and share your whole product design workflow.
Sketch
Your idea will be transformed into a pleasant design and prototype via Sketch. It is an all-in-one tool for making animated timelines, UI elements from wireframes, and mockups from screenshots. Users may add animations, switch between design screens, and work on working prototypes in Sketch with just a few clicks. It also supports all screen sizes (artboards). The usage of Sketch’s Vector shapes helps you avoid tedious hand-editing by simply adapting to changing styles, sizes, and layouts.
Figma
Figma allows the team working on a project can easily access and collaborate using the cloud-based prototyping environment. Although it shares many capabilities with Sketch, Figma has an advantage due to the way it streamlines the creation process and offers tools for keeping track of everything.
It allows in-app commenting in both the design and prototyping modes, while teams can follow remarks in Slack or Email.
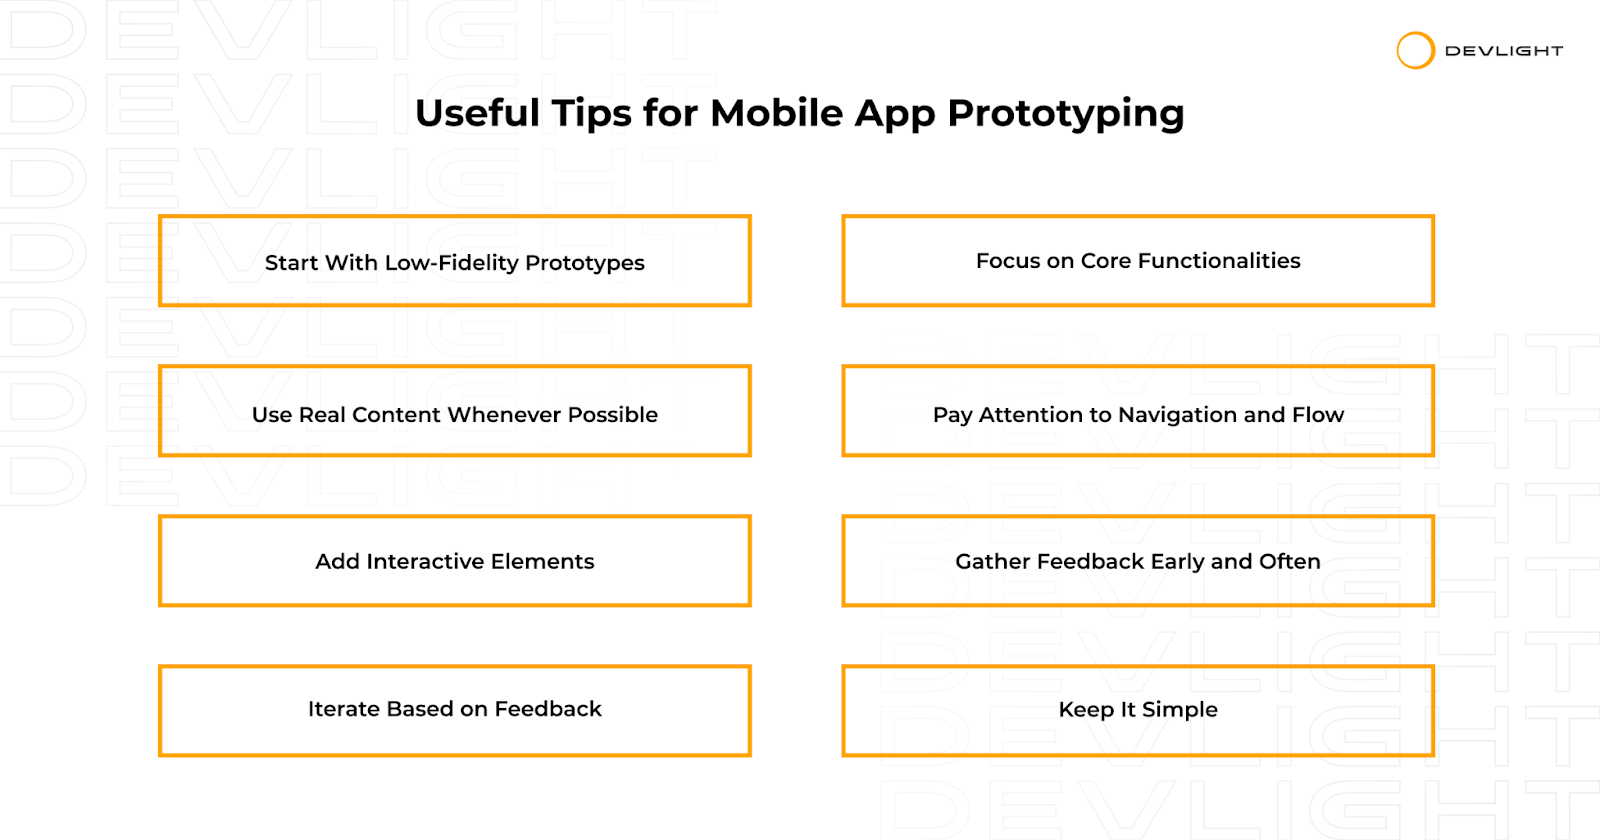
Running prototypes is essential for app development because it enables you to test your app’s functionality and flow with actual users. You can use this information to improve your app. However, there are countless ways to do it incorrectly and just a handful of ways to do it correctly, just like with anything else. These are a few of the best practices:
Low-fidelity prototyping is a quick, easy technique to transform a basic concept or idea into a somewhat more realistic depiction of your finished product. A low-fidelity prototype’s sole purpose is to sketch out the workflow and assess the value and usability of the suggested functionality. Lo-fi prototypes can be created on paper or digitally. Examples comprise:
Low-fidelity prototypes have several advantages, but their main characteristics are speed, simplicity, and affordability. Since the prototypes are obviously not finished products, making adjustments and testing new iterations is simple. Additionally, they promote design thinking.
You shouldn’t include every feature in your prototype, similar to the level of detail. The features to include in the prototype should be prioritized.
Depending on whatever exact components of your app you want to test, these may look like whatever you decide. How to create a prototype for a mobile app and test core functionality? Focus on your value proposition, which is the main or standout benefit customers can obtain from your app if you’re having trouble deciding which features to include. Determine the elements enabling that.
Keep in mind that prototypes test the functionality of your app. They are available to rapidly test your app with users, gather feedback, and make improvements. Because of the need for quick iterations, your prototype needs to be as light as feasible. Instead of creating a flawless version, the objective should be to create one that can be tested quickly.
You need to maintain only the information that is necessary to accomplish this. Avoid using fonts, patterns, colors, and other visual elements that don’t improve the operation of your program.
How to create a prototype for a mobile app that will feel intuitive? You should avoid using placeholders in your prototype in particular. Real information here is crucial since it helps users understand the function and goal of your app’s interface. A user shouldn’t face trouble navigating the prototype. Adding real-life materials should help, not puzzle, so choose simple examples and straightforward info.
Don’t mistake using real data for actual one, though. Here, the idea of using things that are “good enough” also holds true. To put it another way, attempt to write the copy as it will appear in the finished application, but don’t worry about making it perfect or unique, this is the job of an editor involved at the final stages.
User flows are essential processes, even during the wireframing phase. It enables you to identify trouble spots and cut out potential friction-causing stages before you start designing your prototype. Additionally, you’ll have a good idea of how many displays you require, assisting you in avoiding needless prototype effort. You may save a ton of time and money by identifying and resolving design issues early by using user flow diagrams.
Reusable UI elements from a design system known as interactive components (or interactive elements) are game-changers for designers who often deal with UI kits and must develop interactions for each project. Most design tools don’t have the capability or fidelity engineers achieve with a few lines of code to handle basic interactions. Reproducing code functionality with interactive components is simpler, creating immersive, lifelike prototypes for usability testing and stakeholders.
The design thinking method and all other human-centered design processes depend heavily on gathering feedback. However, you must be deliberate while seeking feedback if you want to get the most out of it. Here are some recommendations to keep in mind while you collect customer feedback:
In the end, prototyping is all about allowing your users to voice their ideas about your solution. And if you’re not introducing these into your app, your prototype’s potential is not being fully realized. Keep the whole procedure as simple as possible. The goal is to swiftly make changes in response to the feedback so you may test your prototype for a mobile app again. This feedback cycle continues until the final prototype is acceptable to you and your end users.
The ultimate founder’s checklist of 75 tasks to build, launch & scale your app 3-5x faster systematically. Proven by 35M of app installs!
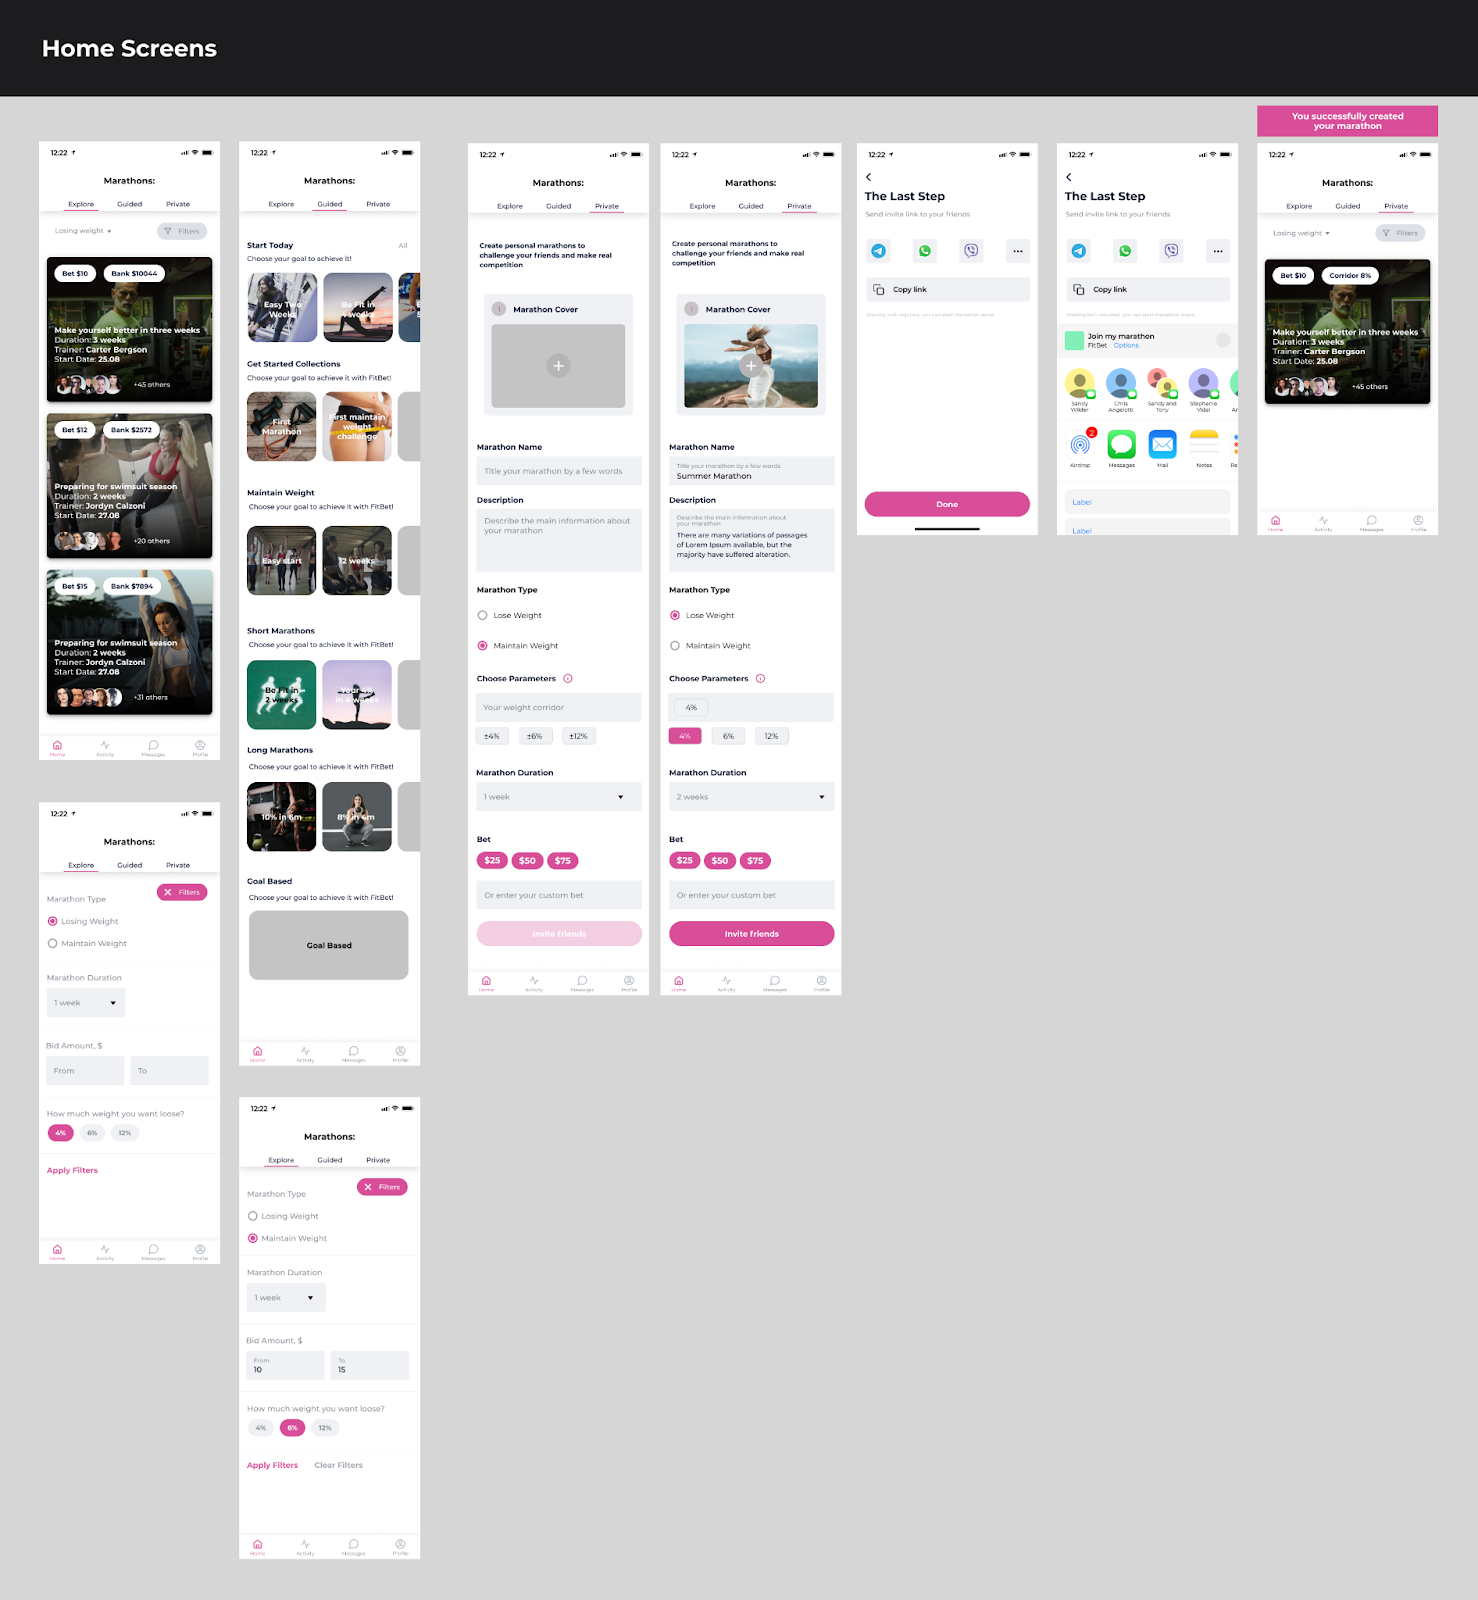
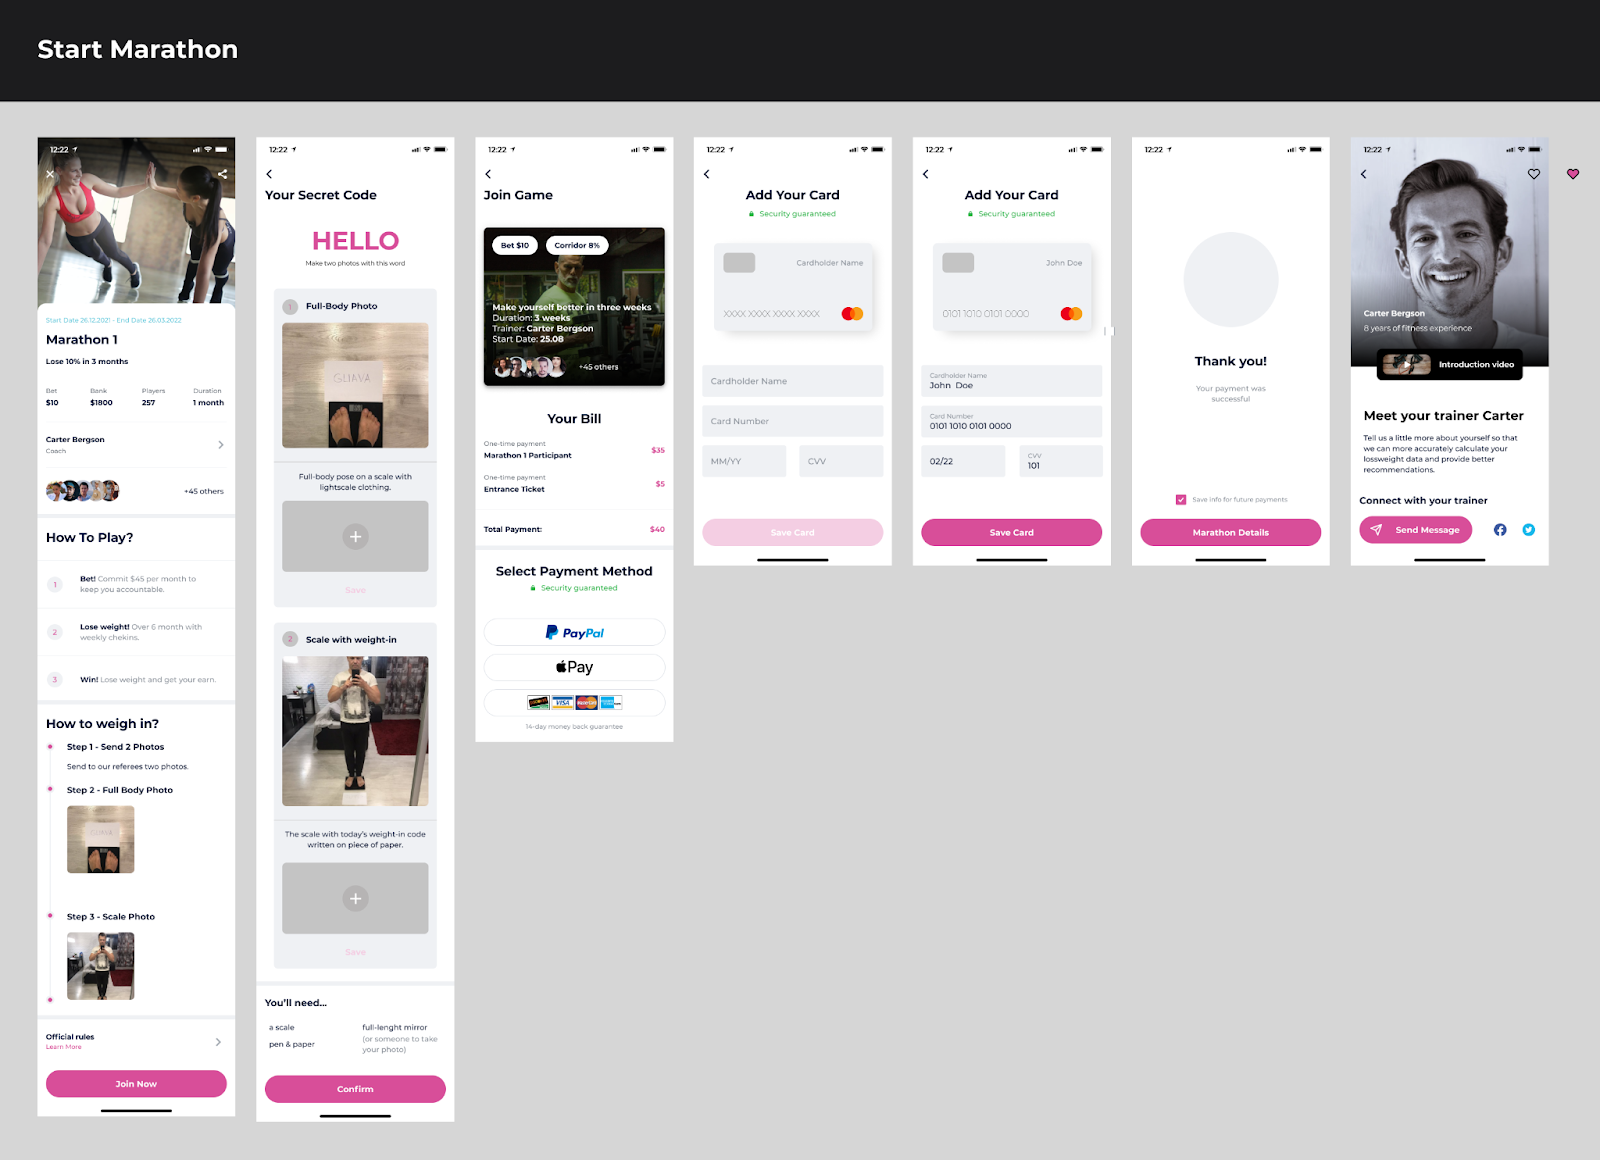
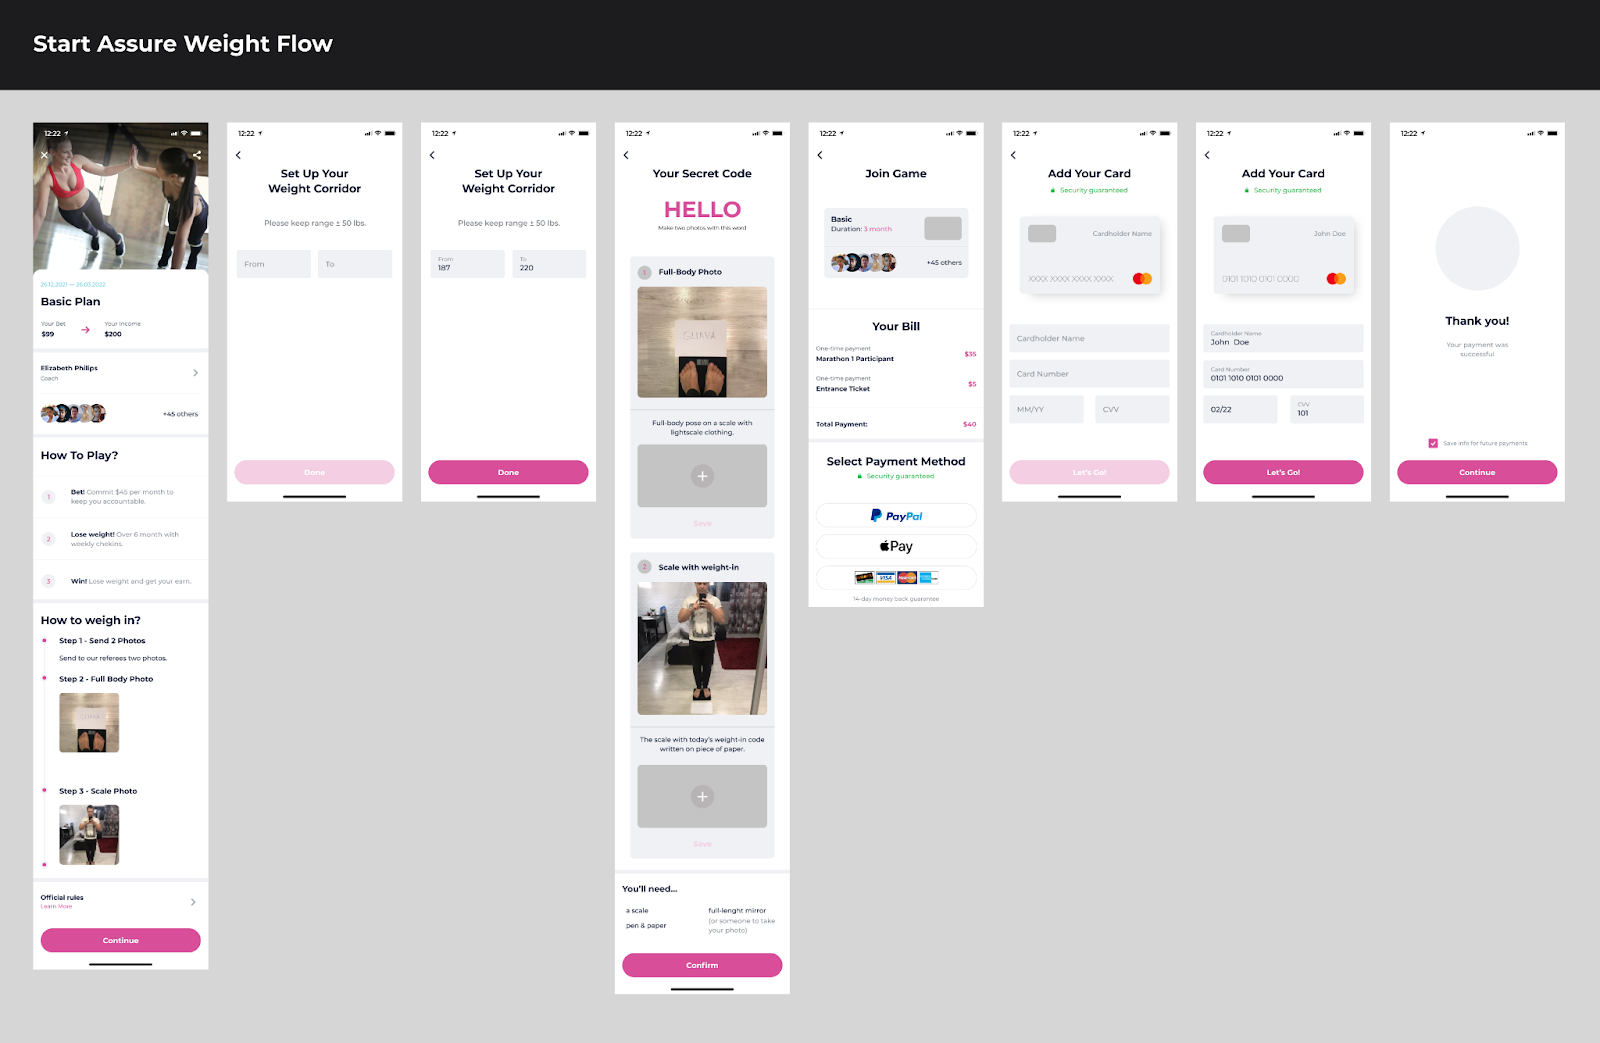
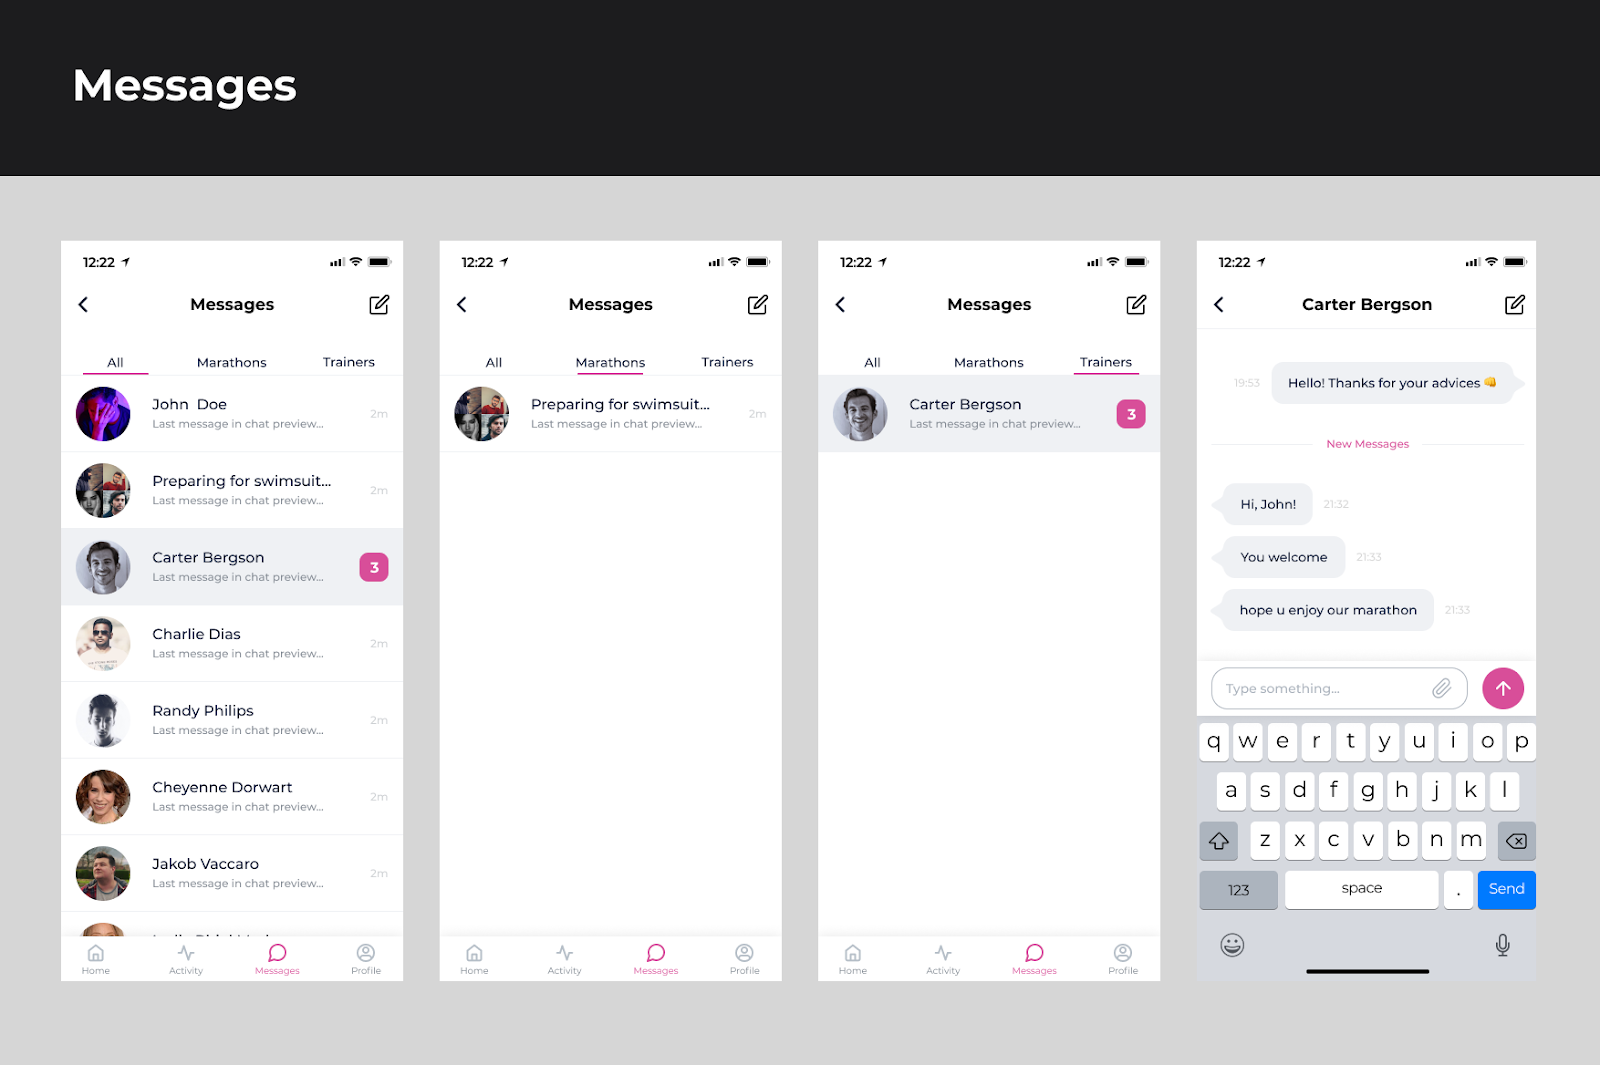
At Delight, we love making the digital world better. A client approached us with the desire to create an app that taps into the psychology of human behavior to provide people with the ultimate motivation to shed those extra pounds.
FitBet leverages the concept of financial motivation to encourage reaching weight loss goals. With FitBet, you’ll not only experience significant improvements in your health and well-being but also have the opportunity to earn money as you shed those unwanted pounds.
Here’s how it works: Once you download the FitBet app and set your weight loss goals, you’ll be able to join challenges with like-minded individuals who share similar aspirations. Each challenge will have a specific duration and target weight loss goal. To participate, you’ll place a predetermined amount of money into a virtual “pot” that serves as your financial commitment.
Throughout the challenge, FitBet will track your progress using cutting-edge health monitoring technology integrated into your smartphone or wearable device. Whether monitoring your steps, counting calories, or tracking your workouts, FitBet keeps a close eye on your efforts, ensuring accuracy and fairness.
At the end of the challenge, those who successfully achieve their weight loss goals will receive a share of the pot, while individuals who don’t meet their targets will forfeit their financial commitment. Here is our prototype for a mobile app example created with best practices in mind.


A commonly used app testing technique called prototyping enables you to adjust the essential features of your app and evaluate its performance in a real-life setting before investing in actual development. The many approaches, resources, and advantages of prototyping focus on a single goal — saving time and effort. Because even if the prototype requires multiple iterations, the final product’s cost will be substantially lower than that of just one unanticipated change round in development.
A prototype for a mobile app is an interactive mockup showing an app’s appearance, features, and user experience. Also known as clickable wireframes, the app’s prototype does not contain the programming required to make a fully functional application. It may come in many different forms. The simplest is a low-fidelity prototype comprising a hand-drawn doodle on paper. In contrast, high-fidelity prototypes are fully clickable simulations of final products with content mimicking unique data and interactive elements.


![How to Name an App in 2023 [Trends, Cases, and Mistakes]](https://devlight.io/wp-content/uploads/2023/05/Blog-Cover-3.png)

![How to Define Your App’s Unique Value Proposition [The Definitive Guide]](https://devlight.io/wp-content/uploads/2023/03/How-to-Define-Your-Apps-Unique-Value-Proposition-1.png)
![How to Fill Out a Value Proposition Canvas for Your Mobile App [The Definitive Guide]](https://devlight.io/wp-content/uploads/2023/03/How-to-Fill-Out-a-Value-Proposition-Canvas-for-Your-Mobile-App-1.png)


![How to Conduct Mobile App Research in 2023 [Market Research Step-by-Step Guide]](https://devlight.io/wp-content/uploads/2023/02/Market-Research-Step-by-Step-Guide-2.png)


GOT A PROJECT IN MIND?